The Facebook Tab Page is obsolete due to Facebook Timeline changes.
If you would like to have a link to your campaign on your Facebook Timeline page, we recommend using a normal post (status update/URL) pointing to your Campaign Home Page on Facebook. This URL can be found on your campaign in VinattaHQ.
Please also note that status updates/posts can be made sticky so that it appear at the top of your Timeline.
Note. The rest of this article does not apply anymore.
Prerequisites
Facebook Page
If you do not already have a Facebook Company Page, you will need to
create it using the normal Facebook procedures.
Design and Publish a Vinatta Campaign
1. Upgrade to a “Standard” Plan Campaign if you have not already done so.
2. Design the Facebook Tab Page in the Campaign Designer.
3. Publish the Campaign.
You are now ready to create a Facebook Page Tab.
Facebook Developer App
Go to the official Facebook Developer App page.
It can be found here: https://developers.facebook.com/apps
Create a New Facebook App
Once inside the Developer App, click the “Create New App” button at the top right of the screen.
Give the App a Display Name and leave the App Namespace blank:
Continue and complete the Security Check.
Facebook App – Basic Settings
You should now see the Basic App Settings for your new App.
1. Set the App Domain field
Type in: vinattaengine.com
2. Scroll down and expand (click on) the “Website” section.
Copy the Facebook Website URL from your Campaign Publish Tab in Vinatta and paste it into the Facebook App Site URL Field.
3. Scroll down and expand the “Page Tab” section.
Fill in the Page Tab Name field.
Copy the Page Tab URL from your Campaign Publish Tab in Vinatta.
Paste the URL into the Facebook App “Page Tab URL” and “Secure Page TAB URL” fields.
4. Click Save Changes.
5. You might want to add an icon or do other changes to your new Facebook App, but you
can always do this later.
Facebook App – Advanced Settings
Select your new App in Facebook and go to Settings -> Advanced.
It is found in the menu at the left hand side of the screen.
Scroll down to Canvas Settings and set the following values:
Set Canvas Width to “Fluid”.
Set Canvas Height to “Settable (Default: 800px)”
Click “Save Changes”.
Optional: In the Contact Info fields you can either add your own URL’s or you might use Vinatta’s Privacy and Terms of Service URL’s.
Set the Privacy Policy URL to: http://www.vinatta.com/Privacy
Set the Terms of Service URL to: http://www.vinatta.com/Terms
You have now created your new Facebook Tab App!
This new App can be added to one or more Facebook Pages.
You may copy the Facebook App ID of your new app before you continue to the next step.
The App ID is found in the Facebook App Basic Settings.
Add your new Tab App to one or more Facebook Pages
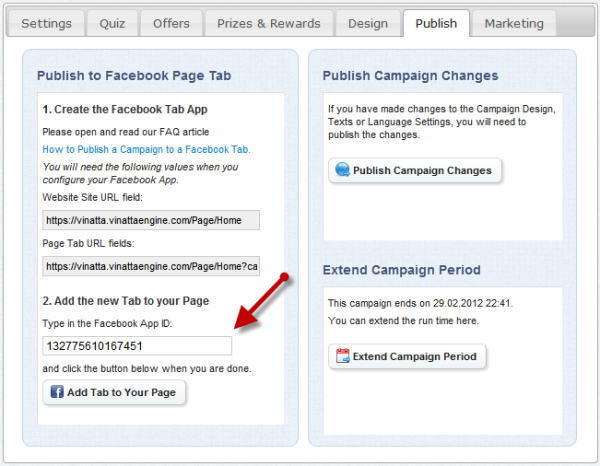
1. Go to the Publish Tab in the Vinatta Campaign Manager.
2. Type in the Facebook App ID of the application you created in the previous step.
3. Click the “Add Tab to Your Page” button.
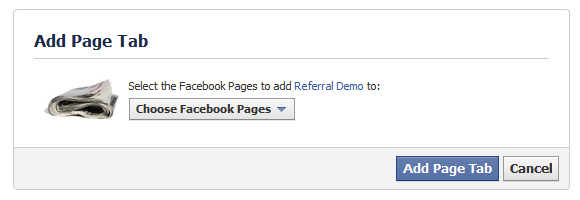
This will open a new window where you will see Facebook’s Add Page Tab Dialog:
4. Select the Facebook Page you want the Tab App to appear in from the drop down list.
5. Click the “Add Page Tab” button.
The new Tab has now been added to your page.
6. Go to your Facebook Page and alter the position of the tab if you like.
7. If you want this Tab to be the default page for new visitors to your Facebook Page,
click the Facebook “Edit Page” button and set the newly added Tab as your default page.


